Pattern Review & Guide
Jewel Box Shell Crochet Top: The Breezy Lace Project You’ve Been Waiting For
A complete guide to making this elegant openwork shellfrom yarn selection and sizing to button placement and styling tips.
Picture this: a warm afternoon, a light breeze, and a top that looks like you spent hours in a boutique picking it outbut you made it yourself. That’s exactly the energy the Jewel Box Shell brings to your wardrobe. Designed by Kristen Stoltzfus Clay for WeCrochet, this crochet shell top is everything a warm-weather project should be: airy, textural, beautifully constructed, and surprisingly approachable for anyone who’s comfortable with basic crochet stitches.
Whether you’re a seasoned crocheter looking for your next satisfying garment project, or a confident beginner ready to graduate from dishcloths and scarves, this pattern has something for everyone. Let’s dive deep into what makes the Jewel Box Shell so specialand how you can make yours a true success.
Pattern At a Glance
Why Crocheters Are Obsessed With This Pattern
Garment patterns can be intimidatingconfusing shaping, countless seams, or construction methods that feel far beyond reach. The Jewel Box Shell sidesteps nearly all of those pain points. Here’s why it deserves a spot at the top of your queue:
- Flat panel construction. The top is worked in two simple rectangular panels (front and back), then sewn at the sides. No shaping rows, no increases or decreases mid-fabric. If you can crochet a rectangle, you can build this garment.
- Built-in button loops. The chain spaces along the top row of each panel double as button loops at the shoulder. That means no separate buttonhole rows, no tricky edgingsthe closure is already woven into the structure of your work.
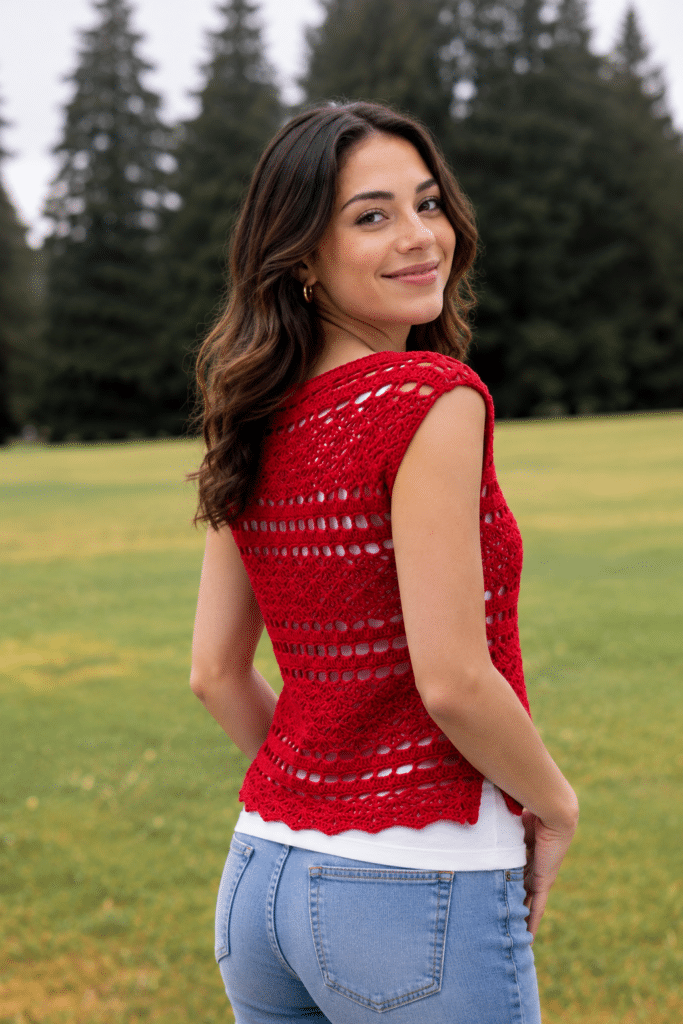
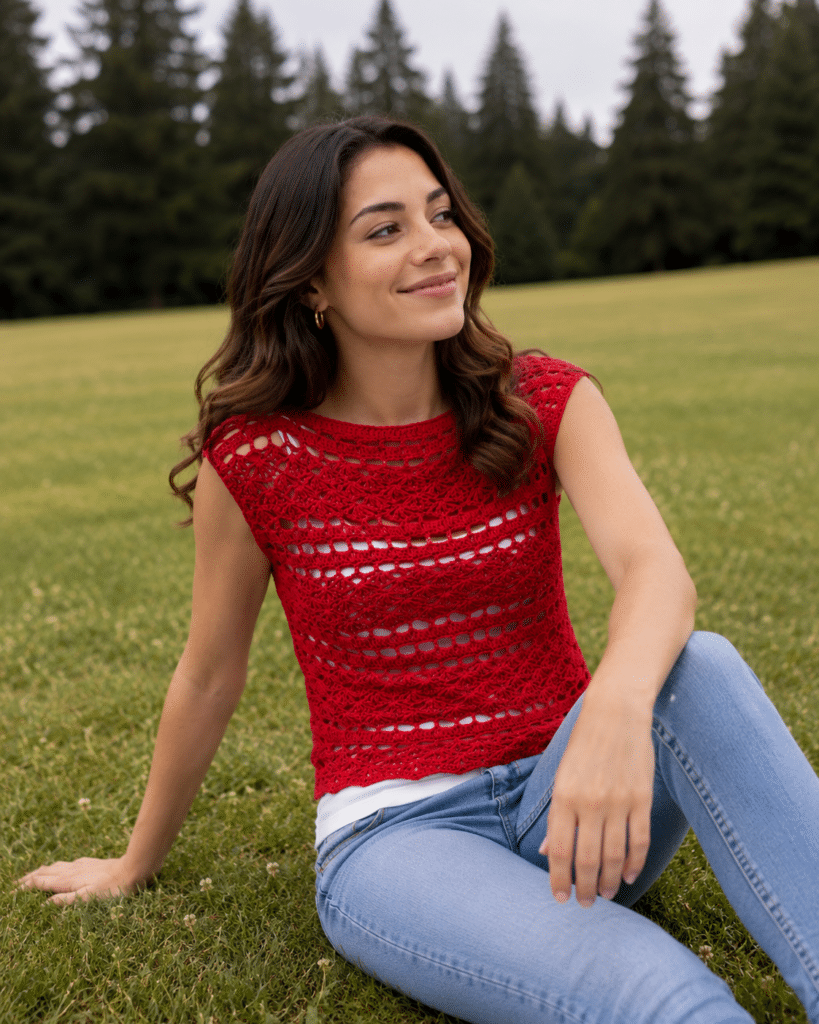
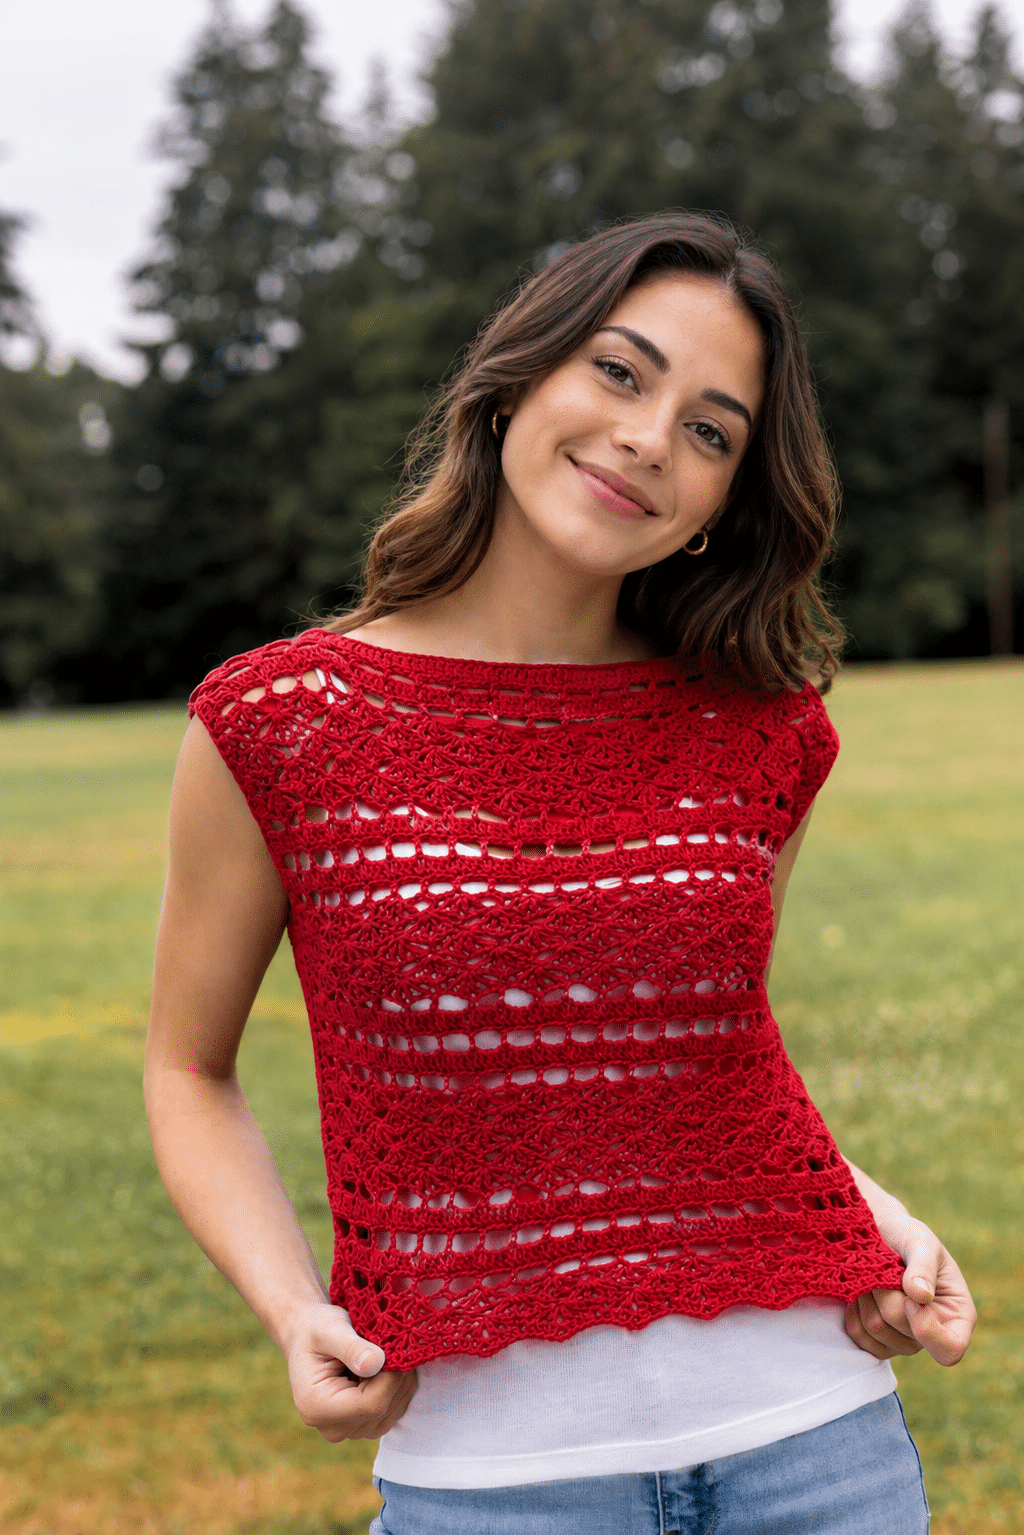
- Stunning visual payoff. Alternating sections of openwork lace shell stitch and dense “ribbon” rows create a rhythm that looks far more complex than it actually is. The finished fabric photographs beautifully and drapes elegantly on the body.
- Inclusive sizing. With nine sizes spanning a 33.5″ to 69″ finished bust measurement, this pattern genuinely accommodates a wide range of bodies a rarity in the crochet garment world that deserves to be celebrated.
- Customizable personality. Simple silver buttons keep it understated; swap them for jeweled or vintage buttons and you’ve got a completely different vibe. This top truly goes from farmers’ market to rooftop dinner depending on how you style it.
Yarn & Materials: What You’ll Need
The Recommended Yarn: Cotlin™ DK
The pattern calls for Cotlin™ DK by WeCrochet a 70% Tanguis Cotton / 30% Linen blend that comes in at 123 yards per 50g skein. The colorway used in the samples is a soft sage green called Sagebrush, and it’s an absolutely perfect choice for a warm-weather lace top.
Why does this blend work so well? Cotton provides structure and stitch definition your shell stitches will pop clearly and hold their shape after blocking. Linen adds a subtle drape and breathability that makes the fabric feel weightless in summer heat. It also softens beautifully with washing, meaning this top will get better and better over time.
Yarn Substitution Tips
If Cotlin isn’t available in your preferred colorway or is outside your budget, look for a DK weight cotton-linen or cotton-blend yarn with similar yardage per gram. Key properties to prioritize:
- Good stitch definition (avoids fuzzy or heavily textured yarns that hide the lace pattern)
- Minimal stretch linen or cotton content helps the garment hold its shape
- Breathable natural fiber content for comfort in warmer weather
- Smooth plied construction that slides easily over your hook
Popular substitutes in the crochet community include Lion Brand 24/7 Cotton (worsted go down a hook size), Paintbox Simply DK Cotton, and Drops Safran for a linen-forward feel.
Tools & Notions
Beyond yarn, you’ll need a US G (4.25mm) crochet hook though as always, gauge is more important than hook size, so swatch first and adjust accordingly. You’ll also need a yarn needle for weaving in ends and seaming the sides, scissors, and a stitch marker to track your place. The star notions, though, are the 17mm buttons. The pattern uses antique silver floral swirl buttons (8 to 20 depending on your size), but this is where you can let your personality shine.
Skill Level: Who Is This Pattern For?
The Jewel Box Shell sits comfortably in the confident beginner to intermediate range. Here’s an honest breakdown:
Stitches You Need to Know
The construction relies on three core crochet stitches: the double crochet (DC), the half double crochet (HDC), and the slip stitch. There are no advanced techniques like Tunisian crochet, granny squares, or intarsia colorwork. The “Shell” stitch used throughout is simply a specific grouping of double crochets and chain spaces worked into a single stitch something you’ll master within the first couple of rows.
What Might Challenge You
Reading a multi-size pattern for the first time can feel overwhelming. The instructions list stitch counts and row ranges for all nine sizes simultaneously, separated by parentheses and dashes. Before starting, go through the entire pattern and highlight or circle every number that applies to your chosen size. This single step will transform the pattern from confusing to completely clear.
The rhythm of alternating lace and solid rows also takes a row or two to click but once it does, it becomes almost meditative. Many crocheters report that this is a fantastic “movie night” project once the pattern repeat is memorized.
How the Jewel Box Shell Is Built: A Construction Overview
Understanding the construction logic before you cast on (or chain up, rather) makes a tremendous difference. Here’s a bird’s-eye view of how the pieces come together.
Step 1 Starting Chain and Foundation Row
Both the front and back panels begin with a long foundation chain. The garment is worked top down, meaning the chain you start with becomes the neckline and shoulder edge. This is clever construction it means the chain spaces at the very beginning of the work naturally serve as button loops at the shoulder without any additional finishing rows needed.
Step 2 Building the Fabric: Ribbons and Lace
The body of the top alternates between two distinct fabric textures. “Ribbon” sections consist of dense double crochet rows that create a solid, structured band like a woven ribbon running horizontally across the garment. Between these solid ribbons, sections of shell stitch lace create the open, airy fabric the pattern is named for. This rhythm repeats all the way down to the hem, creating a striking and structured visual pattern.
Step 3 The Hem Edging
Once the main panels are complete, a finishing round of half double crochets is worked along the side edges, and a decorative hem edging is crocheted in the round at the bottom. This hem reinforces the shell lace motifs along the lower edge, giving the finished garment a polished, intentional look rather than a raw edge.
Step 4 Seaming and Buttons
Front and back panels are sewn together at the sides with a simple mattress-style seam, leaving the top portion open for the armhole. Buttons are then sewn onto the front shoulder sections, aligning with the chain-space button loops on the back shoulder. The result is a clever, fully adjustable closure that requires zero additional buttonhole construction.
Tips & Tricks for a Flawless Finish
- Swatch and block your gauge swatch. Cotton and linen yarns relax and open up significantly after blocking. Your pre-block gauge and post-block gauge can differ by a full stitch or more per inch and in a garment this makes a meaningful size difference. Always wet-block your swatch before casting judgment.
- Mark your size throughout the pattern. Use a highlighter or a PDF annotation tool to mark every number, row count, and stitch count that corresponds to your size before starting. This is not optional it will save you from costly mistakes mid-project.
- Count your stitches at the end of every row. Especially during the transition rows between lace and ribbon sections, a missed stitch or skipped chain space can throw off the entire pattern alignment. A quick stitch count takes 20 seconds and prevents hours of frogging.
- Use a locking stitch marker on your “right side.” The pattern specifies RS (right side) for certain finishing rows. Mark the RS at the start of the project so you always know your orientation, especially after setting the work down.
- Block aggressively. This is a lace pattern blocking is not optional, it’s transformational. Wet the finished panels, pin them out to the schematic measurements, and allow to dry completely before seaming. The stitch definition and drape will improve dramatically.
- Choose buttons that fit through the chain loops. Test your chosen buttons against the chain-5 button loops before purchasing. The 17mm size specified is well-calibrated for the chain spaces in the pattern, but if you substitute yarn at a different gauge, loop size will vary.
Common Mistakes to Avoid
| Mistake | Why It Happens | How to Avoid It |
|---|---|---|
| Skipping gauge swatching | Feels like a time-waster before the “real” project | A swatch takes 30 min. A wrongly-sized garment means weeks of wasted work. Swatch, then block. |
| Miscounting shell stitch repeats | Shell rows require careful spacing an off-by-one skips or crowds a shell | Mark the center ch-1 sp of each shell with a stitch marker as a visual anchor |
| Forgetting that Ch 3 counts as a DC | Pattern notes this clearly, but it’s easy to forget mid-project | Write a sticky note on your pattern: “Ch 3 = DC, Ch 4 = DC + ch 1” |
| Seaming too tightly at the sides | Overcorrecting for fear of gaps | Use a relaxed mattress stitch the seam should match the stretch of the fabric |
| Skipping the HDC edge on panel sides | Looks unimportant compared to the main fabric | This edge stabilizes the armhole and provides a neat seam allowance don’t skip it |
Styling & Gifting Ideas
How to Wear the Jewel Box Shell
The magic of this top lies in its versatility. Worn over a simple white tank or bandeau (as shown in the pattern photos), it creates a relaxed, bohemian layered look that’s perfect for summer markets, beach days, or weekend brunch. Tuck the front into high-waisted linen trousers and swap the silver buttons for pearl or shell buttons and the whole outfit shifts into something brunch-ready or even vacation-elegant.
For evening, pair the shell with wide-leg satin trousers and jeweled buttons (living up to the “jewel” in its name). A denim jacket thrown over the shoulders for a cooler evening extends the wearability well into early autumn.
Gifting This Pattern
The Jewel Box Shell makes a genuinely impressive handmade gift. If you’re making it for someone else, take careful measurements and add 1″ of positive ease (as the pattern recommends). The button customization means you can tailor the finishing entirely to the recipient’s personality vintage brass for a maximalist friend, matte black for a minimalist, or delicate pearl buttons for a romantic aesthetic.
Pair the finished top with a small handwritten note detailing the yarn and care instructions. Cotton-linen blends generally do best with a gentle machine wash cold and a flat dry avoid the dryer to maintain the garment’s shape.
Frequently Asked Questions